

Highly Available VPN on Kubernetes

Background
MyFitnessPal engineering runs the large majority of our cloud infrastructure and applications in private VPCs, and interacting with these resources is an important part of an engineer's daily responsibilities. The Platform Engineering group was asked to provide secure and reliable access to these resources, to replace the outsourced solution that had bridged the gap since December of 2020 when MyFitnessPal was divested from Under Armour.
We chose to implement pritunl, an open source VPN product that supports 3 protocols (OpenVPN, IPSsec, and WireGuard). We chose to use the OpenVPN protocol.
The majority of services that we operate are deployed in Kubernetes, so to maintain parity with team tooling and operations, we opted to host pritunl in one of our Kubernetes clusters. This would provide a standard deployment, self-healing capability, monitoring via our usual toolchains, and other benefits.
Several blockers were encountered while implementing the VPN on Kubernetes, but once solved, the VPN has ran smoothly and reliably on Kubernetes. It has successfully provided us with a feature-rich and stable network access solution.
Architecture
During design discussions, high availability for the VPN was a key requirement. A highly available architecture ensures the VPN will be resilient to failures of a single node or zone so that secure access to internal resources remains possible for engineers. This is something that had bitten us with our prior solution, so we were still smarting from the pain of not being able to reach important resources.
Pritunl supports running multiple instances for load-balancing and high availability with a feature called "Replicated Servers". Typically installed using your native operating system's package manager, and each instance uses a shared MongoDB server to broker inter-server communications.
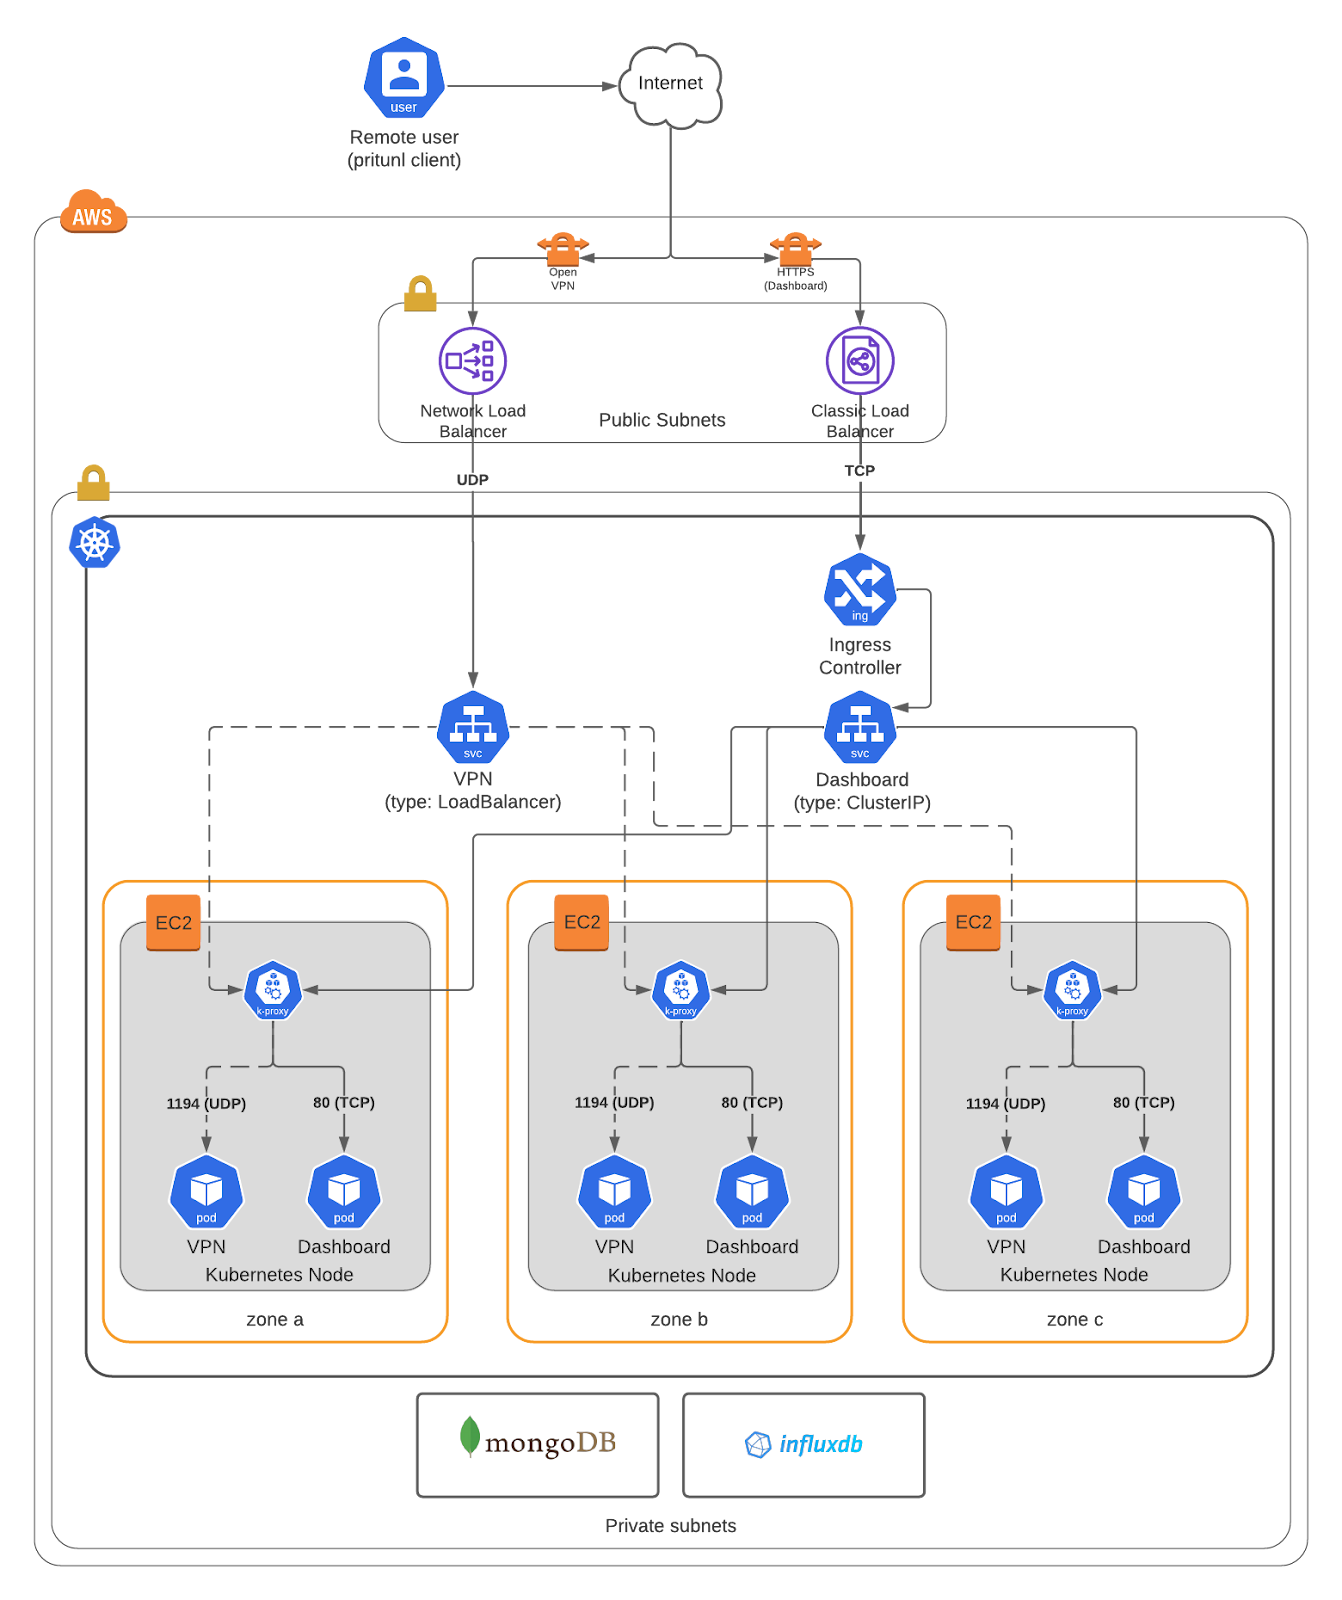
In Kubernetes, pritunl would be made highly available by scheduling its pods across multiple nodes in the cluster. Each node hosting a pritunl pod would be located in a separate availability zone, and to balance requests across the multiple pritunl instances, a load balancer would be utilized.
The design would also isolate UDP VPN traffic and TCP management traffic through the deployment of dashboard pods and VPN pods. We planned to use two different load balancers, since Kubernetes ingress only supports L7 traffic and we wanted to leverage Ingress for the management dashboard.
To support UDP traffic for the VPN we chose to use a Network Load Balancer in AWS as it is the newer implementation. At the time of writing, Kubernetes does not support provisioning a Service of type LoadBalancer with mixed protocols (TCP & UDP) at the same time (even though the cloud providers themselves do), so we can only run a single protocol for the VPN. We opted to use UDP as it will be faster than TCP (due to connection overhead).
Separating the management traffic to its own sets of pods allows for better health checks, isolated security boundaries, and a more performant system due to process isolation. The pritunl installation bundles both the application server (python API & UI server) and openvpn server. Each process requires its own unique healthcheck to detect when the process is “ready”. The team opted to separate these processes into their own individual deployments for simplicity. Each deployment has a single pod with its own healthchecks and preStop and postStart actions.
Client traffic is encrypted by the Pritunl implementation of the OpenVPN protocol and directed to a Network Load Balancer in the public subnet. The traffic is then evenly distributed across private subnets containing the rest of our components. Each node includes a kube-proxy, Pritunl pod, and a dashboard instance. The proxy receives traffic from the NLB and then directs the UDP traffic to the pod over port 1194 and the TCP traffic to the dashboard instance over port 80. Each Pritunl pod is configured to connect to the same MongoDB storage backend.
Pritunl uses MongoDB's inter-server messaging system to form a cluster with a pub/sub messaging feature set known as tailable cursors. Each VPN/Dashboard pod would then subscribe for live updates, and as pods cycle, they would get updated in the datastore and information replicated to the end clients. When designing a system, it is preferable to use a managed service, such that the host infrastructure does not become another management entity. With tailable cursor support not available within AWS DocumentDB, this immediately ruled it out. The team opted to utilize Object Rocket to host a highly available MongoDB instance as the persistent backend for the Pritunl cluster.
Configuration
A VPN server utilizes logical network abstractions, known as network namespaces, to enable the client device to route over its network interface. Pritunl can create servers with routing policies through kernel modules and IP tables. On startup, the application has access to a tunnel device and then enables the net.ipv4.ip_forward bit. Providing the NET_ADMIN capability will allow it to create and manage IP tables rules.
Kubernetes presents two problems: no tunnel device exists within the container, and net.ipv4.ip_forward capability is considered unsafe. To solve the tunnel problem, we found a solution to be executed within the entry point script that creates a directory and corresponding inode to mimic a device.
mkdir -p /dev/net
if [ ! -c /dev/net/tun ]; then
	mknod /dev/net/tun c 10 200
fiFor the sysctl issue, due to the unsafe nature of this parameter, it may be desirable to taint and schedule VPN pods on their own node pool. Once allowed, adding the parameter in the security context ensures that every pod is configured. However, we quickly discovered that Pritunl attempts to set the sysctl on startup, failing immediately on a non-privileged system. To remediate this, we contributed to the project to set the parameter, only if not already set.
Container Entrypoint
Before executing the start command, Pritunl allows for a commandlet of configuration. Pritunl’s design acts as a system where the OpenVPN connection derives from the source's IP address. When working inside ephemeral containers, the end-user should not care about the pod's IP, as it will be routing itself through several layers of service and ingress before reaching the pod. To ensure that a user can have a consistent connection, set app.reverse_proxy to true and host.public_address to "${VPN_ENDPOINT}", where VPN_ENDPOINT is your load balancer/DNS name. Another consideration around load balancing is to ensure the same pod connectivity for users. Providing a consistent endpoint to pod connectivity can be performed by setting SessionAffinity to ClientIP and enabling sticky sessions on the service load balancer. The sticky session setting on the NLB is not available in the Kubernetes service load balancer implementation so it must be set manually after Kubernetes creates the load balancer.
Lifecycle Hooks
On startup of a Pritunl container, its instance is added to the host collection. An operator then has to add that instance to the VPN server for a connection to occur. That server then sits offline in the host list upon termination, which becomes a visual blemish. In a Kubernetes environment, the order of operation becomes a manual intervention anytime a container needs to be rescheduled to remediate these situations. To streamline this process, injecting lifecycle hooks into the process can guarantee a clean environment and a higher uptime.
Gleaning the source code, we can understand the operations needed to take a registered host and append it to the server list. With Pritunl operating state being a two-way channel between app and database, updating the server's collection by appending the host id, will register routes, organizations, and the like. Server registration can be done with the post-start hook. Post start does not guarantee execution before ENTRYPOINT; therefore, there is a loop operation, which will essentially wait for the host to register and then append the host into the server's list.
result=""
while [ "$result" != "1" ]; do
    echo "."
    sleep 1
    result=$(mongosh --quiet --eval "db.hosts.countDocuments({ 'auto_local_address': '$IP', 'name': '$HN' })" "${MONGODB_CONNECTION_STRING}")
  done

  echo "Attaching host to server..."
  ID=$(pritunl get host.id | awk '{print $3}' | tr -d '"')
mongosh --quiet --eval "db.servers.updateOne( { 'name': '$PRITUNL_SERVER_NAME' }, { \$push: { 'hosts': '$ID' }})" "${MONGODB_CONNECTION_STRING}"Within this script, PRITUNL_SERVER_NAME environment is your server name, and MONGODB_CONNECTION_STRING is the fully qualified connection string for connecting to mongo.
Using the pre-stop hook for cleanup operations, we can perform a similar command to cleanse the host from the server list. Simultaneously as a matter of sigterm, we will also want to remove the host from the host list. With the entry script being in bash, this can be done using trap, which allows you to catch signals sent to the entry point and execute a set of commands as a matter of shutting down.
 ID=$(pritunl get host.id | awk '{print $3}' | tr -d '"')
mongosh --quiet --eval "db.servers.updateOne( { 'name': '$PRITUNL_SERVER_NAME' }, { \$pull: { 'hosts': '$ID' }})" "${MONGODB_CONNECTION_STRING}" function _cleanup {
echo "Removing host from database..."
# wait arbitrary time for background pritunl processes to finish their work
sleep 3
ID=$(pritunl get host.id | awk '{print $3}' | tr -d '"')
mongosh --quiet --eval "db.hosts.deleteOne( { '_id': '$ID' } )" "${MONGODB_CONNECTION_STRING}"
}User Connectivity
Out of the box, Pritunl is configured with a CBC cipher, which utilizes XORing blocks. GCM, due to its parallel nature, performed better with our testing when considering ciphers. This will likely allow for more throughput, with each data block being encrypted independently. We also discovered a race condition within OpenVPN that failed the initial cipher negotiation for the VPN data channel.
When the initial cipher negotiation occurs, we discovered a hanging connection, causing clients to have longer times to get to a successful tunnel. OpenVPN allows configuring a field, ping-restart, which places a bandage to reduce overall startup time. As a result of lowering the time when the race condition occurred, killing the process and restarting made it succeed.
To alleviate the problem altogether, we had to perform a few modifications to the configuration provided to the end devices and the entry point. On the client-side, from within our installation, we replaced instances of CBC with GCM through sed:
RUN sed -i -e "s/\(r\s\|'\)AES-\([0-9]*\)-CBC/\1AES-\2-GCM/g" /usr/lib/pritunl/lib/python3.6/site-packages/pritunl/constants.pyWe also disabled cipher negotiating on the server-side, as documented in the bug, since we control it anyway. This is performed on the entry point by setting vpn.ncp_disable true.
Monitoring
The monitoring stack for Pritunl has evolved over the years, with initially several integration services, to where it is today connecting a single influx datastore. Working in the Kubernetes system, the patterns we have established would make it easier to utilize open metrics to dashboard and report on the system's health. In doing research, Prometheus has an InfluxDB exporter that mocks the Prometheus API and converts the posted metrics to the Prometheus standard. Unfortunately, this system only worked for v1, but we updated the application for the v2 endpoints.
There are several metrics worth tracking. Either through the RED Method or the Four Golden Signals, Pritunl exposes a complete array of values. Entities such as
Uptime Metrics:
pritunl_server_device_countpritunl_cluster_server_count
Latency/Traffic Based Metrics
pritunl_server_bandwidth_bytes_recv/sentpritunl_requests_response_time
Saturation Based Metrics:
pritunl_system_cpu_usagepritunl_system_mem_usage
All of which can formulate into a comprehensive dashboard:
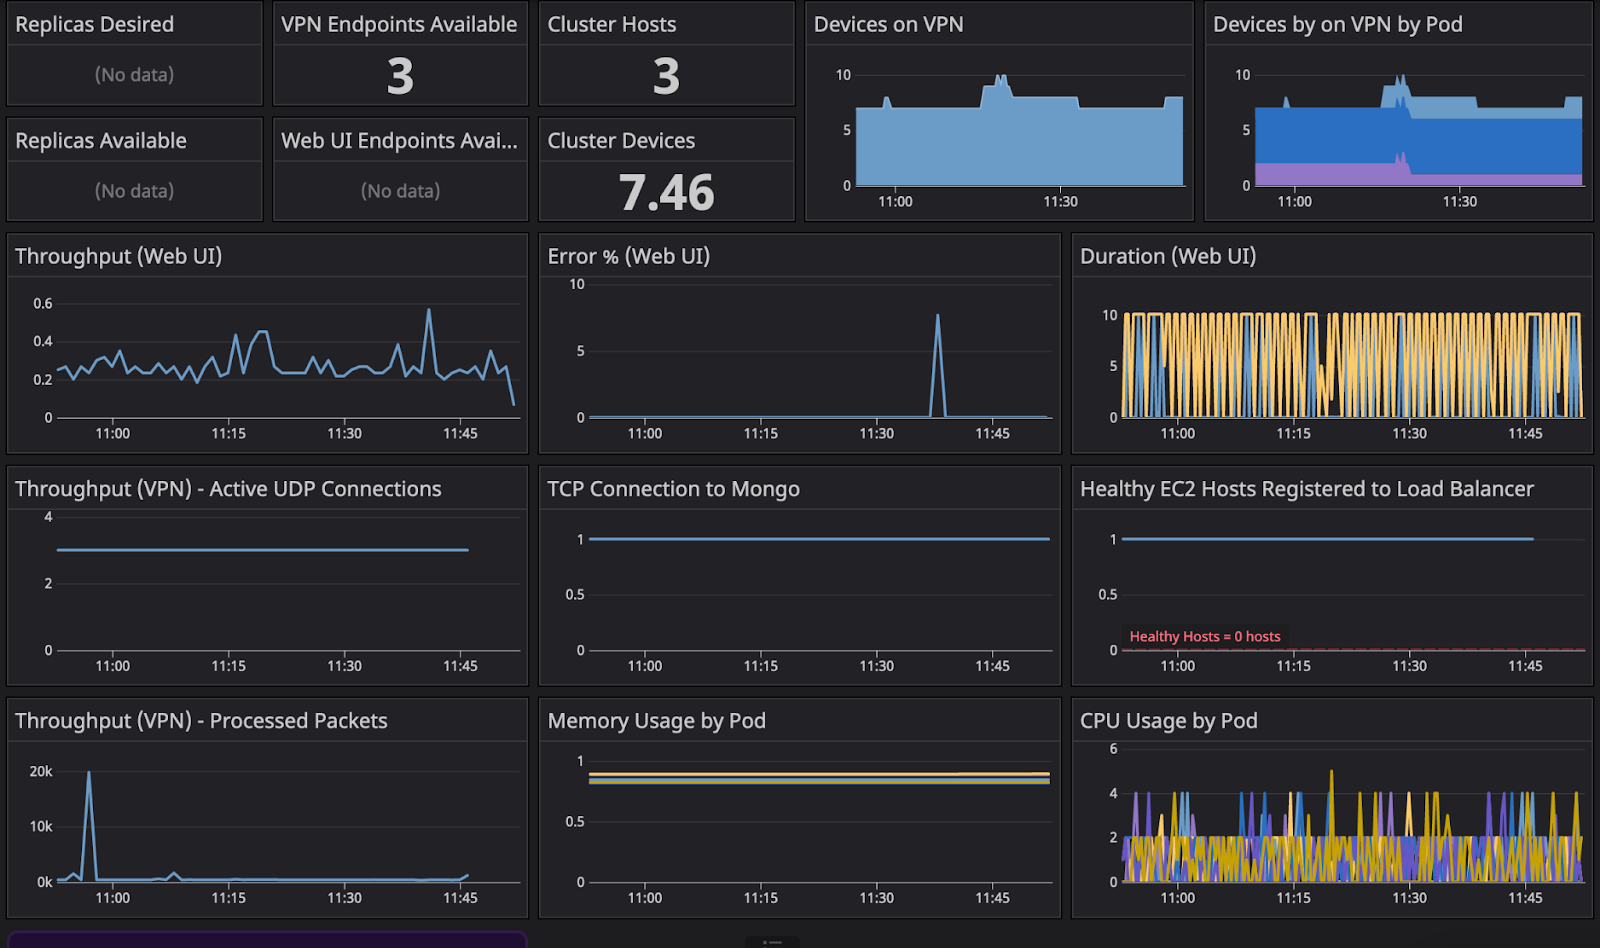
Summary
Overall, the Pritunl VPN performs well in a high availability capacity. We encountered several roadblocks, lessons learned, and some upstream contributions in deploying the stack. In the end, we get the benefits of ease of updating, scaling, self-healing, and fitting into already ironed out practices implemented within a container-based environment.